Announcements
- Home /
- Announcements /
- A home cooks guide to perfect eggs with an immersion circulator
A Home Cook’s Guide to Perfect Eggs with an Immersion Circulator
A Home Cook’s Guide to Perfect Eggs with an Immersion Circulator
Immersion circulators are all the rage these days — the new kid on the home kitchen-gadget block. The beauty of these nifty contraptions, and sous vide cooking, is that they allow you to create a temperature-controlled water bath in which to cook everything from vegetables to shrimp. Many people love using sous vide cooking for meat because it takes out all of the guesswork, leaving you with perfectly tender steak, chicken, or pork chops, every single time. But our favorite way to use it, by far, is for eggs.
Why are eggs so well-suited for sous vide cooking? Between the yolk and the whites, they contain a wide range of proteins that set at various temperatures, so you can drastically alter the texture of an egg by bumping your immersion circulator up or down just a few degrees. In other words, you can achieve textures that simply aren’t possible with traditional cooking methods.
Eggs also come with a natural, watertight cooking vessel — you may know it as “the shell” — so there’s no need to fuss with the plastic bags and vacuum sealers required to sous vide other foods. In fact, the whole process is super straightforward. Just fill a large pot (or Cambro bin, or what have you) with warm water, set the immersion circulator temperature, and cook your eggs.
That said, we do have a few tips from the test kitchen chefs to help you along the way:
-
Wait until your immersion circulator is all the way up to temp before putting the eggs in the water. This can take 5 to 10 minutes. If your water isn’t getting warm enough, cover the top of the pot with plastic wrap.
-
Just like when you boil eggs the old-school way, you’ll want to gently set them in the pot so they don’t drop to the bottom and crack.
-
Always put the eggs in an ice bath when they’re done to stop the cooking process.
Here are, in our humble opinion, the most practical temperatures for making sous vide eggs at home. We cooked all of our eggs for 60 minutes — but part of the fun of cooking sous vide eggs is playing around with various temperatures and cook times. So channel your inner food scientist, and start experimenting!
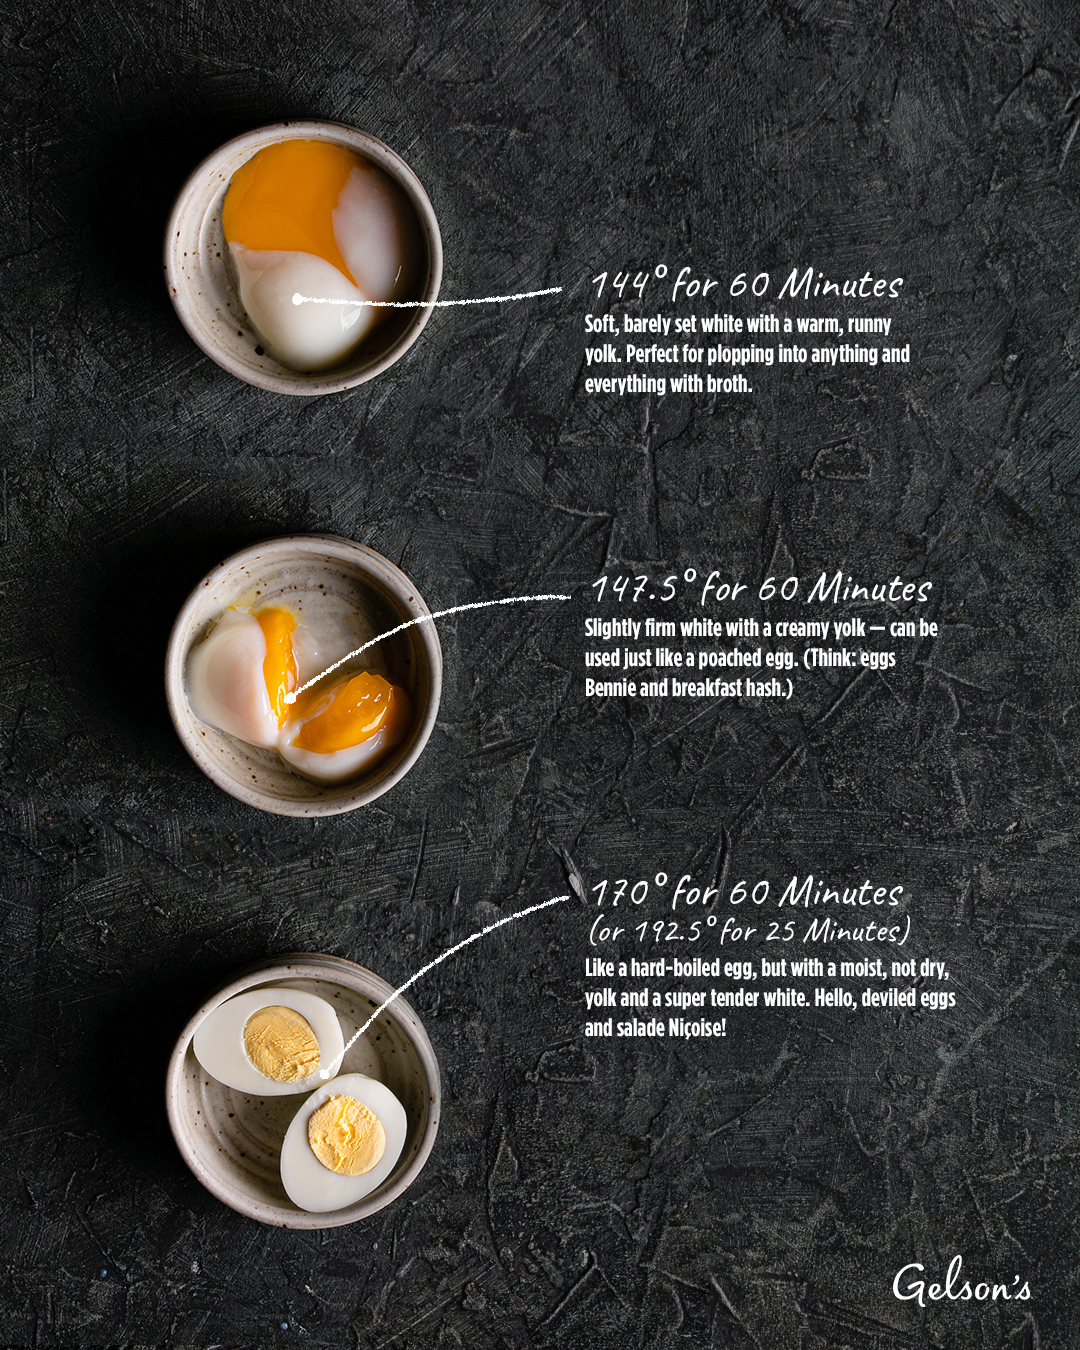
144° for 60 Minutes: Soft White, Runny Yolk
This temperature yields an egg with a barely set white — a delicate casing for the warm but still very runny yolk. This is the perfect example of an egg texture that you can’t achieve using a traditional cooking method; even a mere two minutes in a pot of boiling water would create a noticeably firmer egg white. (Just take a look at the one in our Home Cook’s Guide to Boiling Eggs).
The textures of this egg are great for anything and everything with broth. We especially love using one of these eggs in our shiitake and miso ramen: when you break the white, that runny yolk fortifies the vegetable stock, giving it a silky richness. This fragile little sous vide oeuf is also a good candidate for those fancy egg cups collecting dust in the back of the cabinet: place the egg on its throne, peel a bit of shell off the top, and dunk your toast in all that yolky goodness!
147.5° for 60 Minutes: Firmer White, Creamy Yolk
Bump up your immersion circulator just three and a half ticks, and you’ll find the white of the egg gets quite a bit firmer — like a sturdy poached egg. And the yolk, while not totally set, is much jammier than the 144° egg.
We like to use this one where we’d use a poached egg. It’s fantastic on a slab of avocado toast with crushed red pepper and flake salt, or on top of eggs Bennie. Toss one on a breakfast hash, like this asparagus, bacon, and bell pepper number, or on our fall brunch bowl. We’d even nestle a couple in a bed of greens, drizzle it in a lemony vinaigrette, and call it lunch.
170° for 60 Minutes (or 192.5° for 25 Minutes): Hard White, Fully Set Yolk
We have two options for temperatures here, 170° and 192.5°, both of which result in a similar but better texture than that of a traditional hard-boiled egg. The higher temp is nice if you’re pressed for time; the lower if you need to step out of the kitchen for a while. And we should note that the sous vide process yields an egg with a moist yet firm yolk and a tender, opaque white — not an egg with a dry, powdery yolk and a rubbery white (the cardinal sin of hard-boiled egg-ery). Also: these are way easier to peel than traditional hard-boiled eggs.
You probably guessed that these higher-temp sous vide eggs work for any recipe that calls for hard-boiled ones. Think: Cobb salad, deviled eggs, deli-style egg salad sandwiches, and salade Niçoise. We’d also use a couple in our smoked salmon rice bowl (even though it technically calls for soft-boiled eggs), and then tuck the rest in the refrigerator for breakfast and snacks.